
Sometimes, a creative vision turns out exactly the way I intend to, even if it involves many first times and/or experiments.
This summer, I had been invited to a themed wedding, how exciting! Ever since I started sewing I have been waiting for theme party invites, because who doesn’t love a fancy dress-up, especially with the creative powers of a sewist?!
The general aesthetic of the wedding has been announced as “stars and space” and I knew I wanted to get creative about it.

Celestial fashion on pinterest is all about goth-inspired gowns with massive sleeves (cool!) and sparkly chiffon or velvet fabrics (what’s not to love?!). But the wedding was happening in July, so not the best season for velvet garments, and I also wanted to create something that could be every-day garments if styled differently rather than a (one-) occassion look. And, of course, I wanted to create something unique – hence, something different to the top pinterest result.
I took to my pattern library to search for inspiration and also started to think about accessories. I finally settled on a Culotte-Top ensemble in unique fabric, so that I wouldn’t have to worry too much about jewellery.

The Fabric
Fabric plays a central part in this look, because it takes a classy summer look onto the celestial level. A lot of space-inspired prints that I found online was printed cotton and I imagined it to be too hot in July, and also not really every-day compatible.
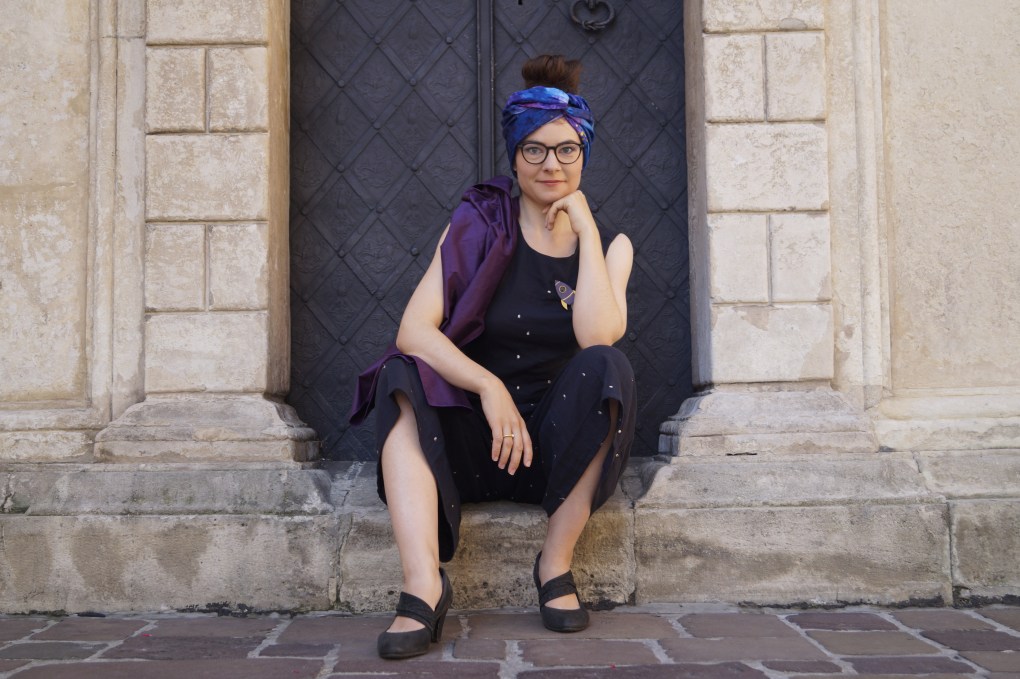
Truth is, I have been eyeing the embroidered “Stardust” Double Gauze fabric by Atelier Brunette ever since I first saw it, and this seemed like the perfect opportunity to use it. I went for the colour “night”, because I liked the blue tint in the images.
When it arrived, the fabric was just as beautiful as hoped, though rather pitch black then dark blue, so keep that in mind when you buy this. Unfortunately, it came with a few rough/ torn spots. Customer service at Atelier Brunette replied immediately and offered kindly to resend fabric, but I managed to cut around the damaged parts with just a little more cut-off.
I ironed the fabric under a layer of thin cotton batiste to protect the embroidery. Not sure if this was necessary, but better safe than sorry! Compared to other double gauze, this one is quite stable and easy to sew, especially after ironing. It is a little sheer which isn’t an issue with close-to-body garments, but you might need a lining for flowy silhouettes.
The Culottes
I had wanted to sew a pair of Fernway Culottes by Twig and Tale all spring, but always envisioned the pattern as a more casual design for forest strolls in style. Using the pattern was a little of an experiment and I was a little concerned mid-way through that they would in fact be too casual for my ideas, but once I put the whole look together that was not the case.

I have sewn many Twig and Tale patterns before this and have never been disappointed by their photo-guided, video-supported and very detailed instructions. Sewing one of their patterns usually not only leads to a nice-fitting garment, but also provides a real learning experience for an advanced beginner like myself.
I usually sew size E in Twig and Tale patterns, but the fit on the Culottes is very generous and my waist size corresponds with their size D chart. I hence decided to go for size D to avoid too much ruffling in the back. I do not have any fit issues.
I had the experience that Double Gauze frays very easily and often rips through seams if not properly finished. I hence overlocked all seam allowances after sewing with the normal machine, even those that are covered and would not usually require finishing. To make sure that the pockets lay flat I snipped the seam allowance before overlocking.
Neat pleats are crucial for the look of the Culottes. I basted all pleats in place below the 1.5cm seam allowance before sewing the waist band to make sure the pleats stay in place all the way down during the sewing process.

I lengthened the Culottes by 6cm in the hem to give them a classy length and I was surprised what a difference a few centimeters can make! I could have even gone a little longer, because I do have rather long legs.
Overall, I did not experience any issues with the pattern. I love Twig and Tale for their versatile designs. The unexpectedly (but hoped for) classy side of this pattern proves this once again.

The Top
I knew that I wanted a tight-fitted shirt to go with the flowy pants. I had followed Stitch Witch Pattern for a while and really enjoyed their patterns, so it was just a question which one I would go for.
I decided on the Bathurst Top by Stitch Witch Pattern. It’s a nice little top with a high neckline (no necklace required!) and wrap ties in the back. The top is finished with an all-in-one facing. I chose a black thin cotton batiste for my lining.

I fall between size 4 and 6 on the size chart. Usually, I have to size down for patterns to sit right, but my test run of size 4 was a little tight. Size 6 fits like a glove (and I’ve worn my wearable muslin A LOT out already).
In my size, you need less then 1m of fabric, especially if you use a different lining, so this is a perfect scrap buster, too.
The top comes together quite quickly, and the instructions are not overly detailed, but clear and well-structured.

Here’s a few notes I put down for myself after my first test run:
- Make sure you press down along the actual seam and not the top-stitch seam when pinning around before sewing the armholes, to make sure the facing sits nice and flat on the body of the shirt.
- When sewing the side seams, it is super important that the seams of both front and back meet right at the center, otherwise you might end up with some of the lining peaking through under the arm. I basted the seams in place before sewing the whole thing.
The pattern only instructs to finish the side seams, but I serged all of the seam allowances to make sure my fabric would not fray. I snipped into the seam allowance at all the curved edges before overlocking/serging.
I added a little tag in the back, but I would advise to sew it right to the bottom of the tie (rather than the centre what I did) to keep it from peaking through when the ties are tied.

The Accessories
My father had the glorious idea of space-painted silk scarfs for both me and my partner. The last time I had painted silk was about 20 years ago, but I do have very fond memories of this creative activity and remembered the joy of creating fuzzy patterns with salt.
I ventured into my local crafts supply store and easily got what I needed: silk scarfs, silk colours (magenta, purple, light blue, dark blue), salt and golden-glittery outline paint.

I wetted the fabric and pretty much just splashed and dropped colour on it with a brush, inspired by images of space nebulas. To have the colours run into each other, I lifted (and tautened) the wet fabric every now and then. I was also very generous with my salt 😉

As a last step (after drying), I dotted little golden spots with my outline paint all over the “nebula” and the result is so pretty, I can hardly believe that I did this at first try! I definitely re-discovered silk painting for myself. I will wear my nebula scarf as a head wrap – ideal for a woman who isn’t very talented about fancy hair looks.

To cover my shoulders in church (this is a Catholic Polish Wedding) or to give warmth as the night falls, I added my own wedding silk scarf/stola to the look. My godmother had a sewist finish a big piece of French wild silk with a rolled hem and I am always looking for ocassions to wear this beautiful accessory.
Last but not least, my husband 3D-printed cute little rocket brooches for us to match. The brooches are handpainted by him and also include a little LED in the “flame” for a special affect at the dance floor.

My partner
That said, a lot of matching was done between my partner and me. I used the same fabric to sew a flowy Cornell Shirt by Elbe Textiles for him.

This double gauze was certainly not the easiest choice for my first ever button-up shirt, but I somehow did it (lots of unripping under the magnifying glass included). I found the illustrated instructions to be very clear and didn’t miss a step.
I struggled big on the collar, but that’s to blame on me and my super-fraying fabric. It doesn’t look super neat and clean, but you can’t really tell if you’re not focusing on the seams – the dark fabric definitely helps!
I wanted to overlock/serge all of the edges to avoid future fraying, so my seam allowances are off by a few millimetres in the French seams, but I think that’s not the reason that there are a few small fit issues. Next time, I would definitely lengthen both the hem and the sleeves, and might also try to go a size up, to fix a slight tightness around the front chest.

I do find the neckband to be very tight! My husband cannot button the neck fully closed (which he never intended, so it’s fine). I wouldn’t know yet at this point what I would change, but something for sure. This won’t be my last Cornell Shirt, it’s the perfect casual men’s wear design in my opinion. I have my father’s size already traced and I found amazing linen-silk fabric during our stay in Poland for him.
My partner paired the dark shirt with his linen (wedding) suit and I can’t get over just how handsome he looked all night! He’s a more casual type than me so this was the perfect combo of casual and chic.
The reception
The looks were an absolute hit during the wedding! Turns out, we were the only guests to actually follow the theme, but I did not feel out of place at all, thanks to the elegant and harmonic vibes. We received lots of compliments and also brought joy to the bride and groom with our creative adaptation of their theme which in turn made me very happy!

Despite the dark colour, we were dressed perfectly for a hot July wedding thanks to the breezy material and flowy silhouettes. Added benefit that I did not even consider before: My outfit was perfect for the huge amounts of food which are, as I have learnt, common in Polish weddings. No discomfort was felt whatsoever even after the 3rd dinner and many snacks! 😉


tolle Idee, tolles Outfit, tolle Umsetzung, tolle Fotos!